Today is National Quilting Day! If there’s a bright spot to this isolation, it’s that we can do more quilting!
I read about a Canadian group of women who are putting a quilt or two outside their homes to help celebrate National Quilting Day as they try to brighten the mood in their neighborhoods. Check them out here.
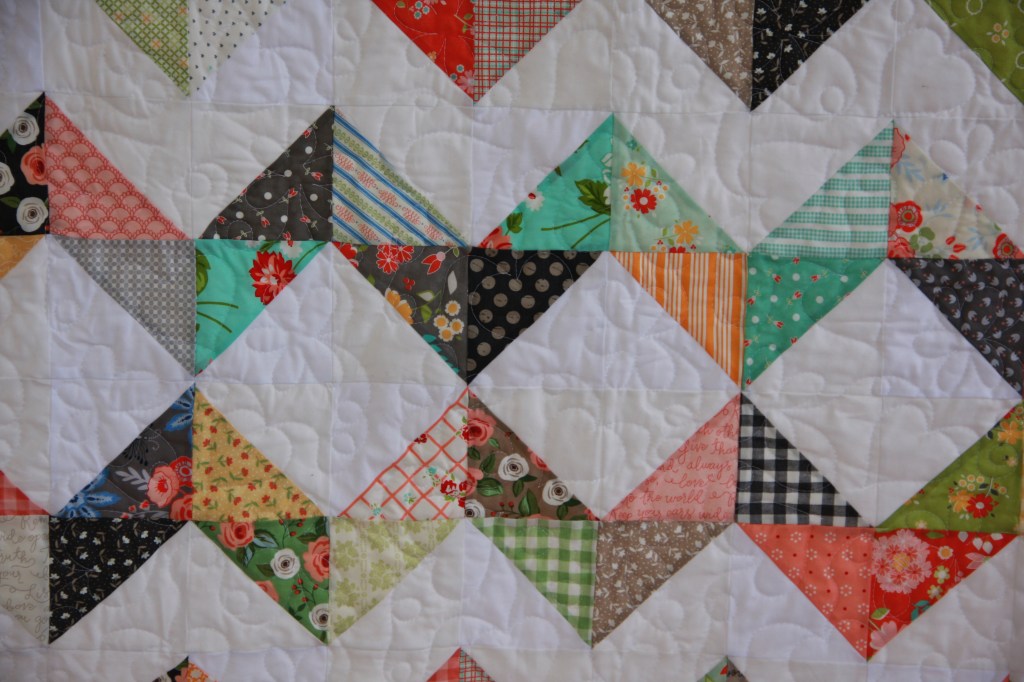
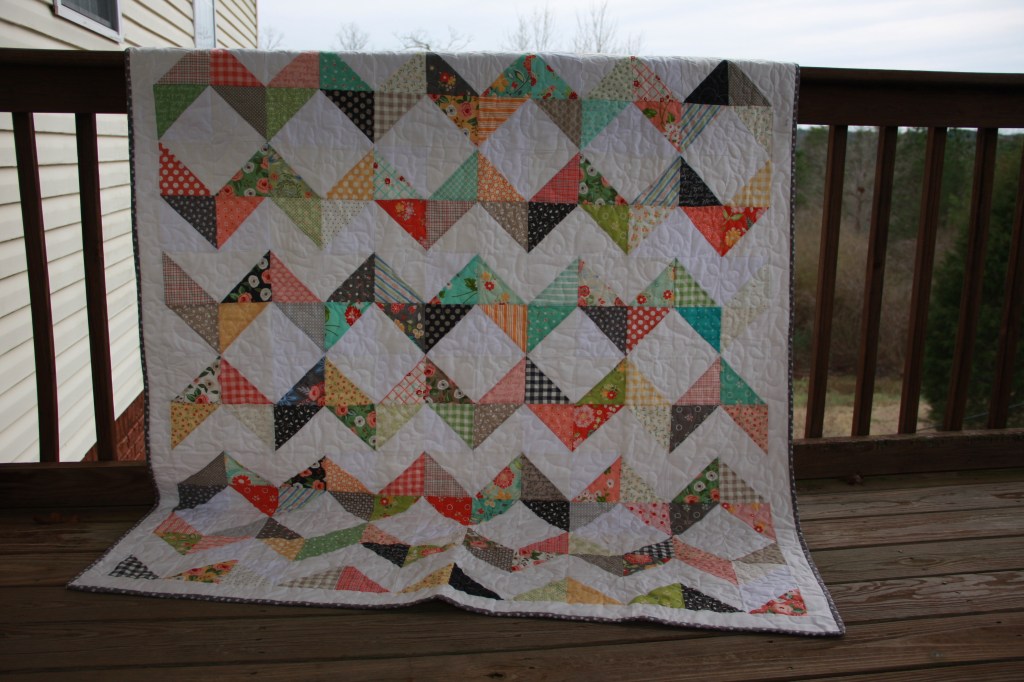
I’m still learning how to best photograph quilts in low lighting, so excuse these attempts, but I wanted to show you my most recent finished quilt. It was made with both a new pack of charm squares and leftover charms from other projects. I think it came out great. On this quilt, I tried a new pattern with half square triangles so it is a chevron on one row and diamonds on another. I may have to try this again as I have a lot of scraps I need to get rid of.
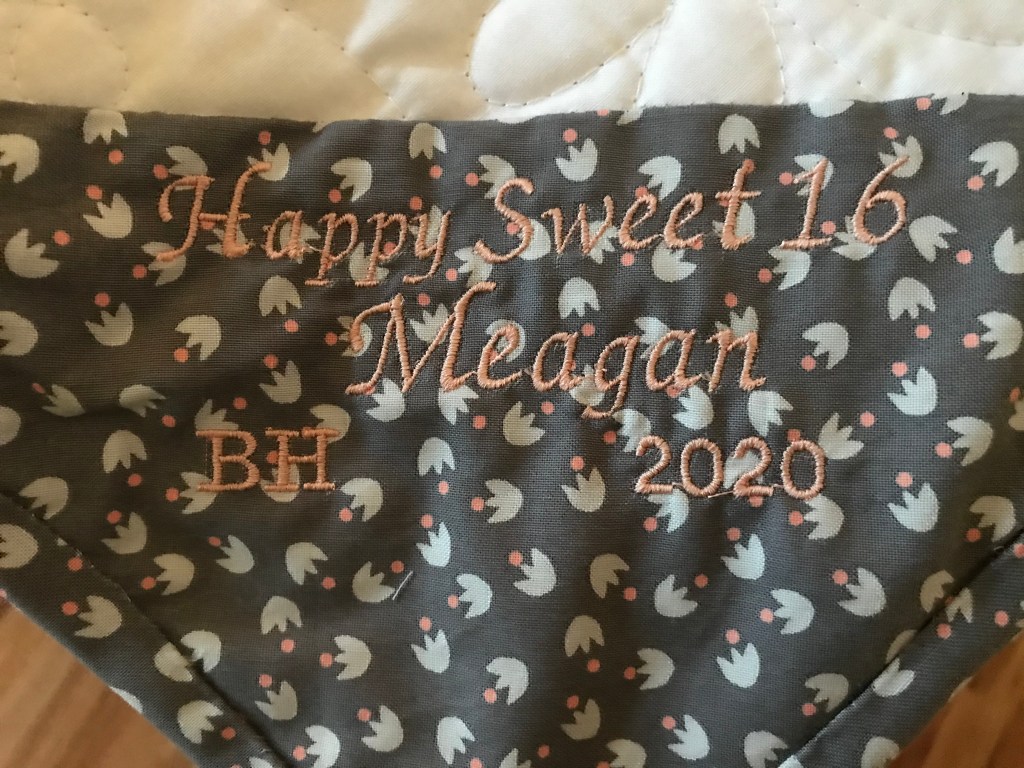
I also monogrammed the back corner – I’m learning to put a historical record on more of my work. I can’t remember things as well anymore, and this will definitely help. I really hope she enjoys her quilt.
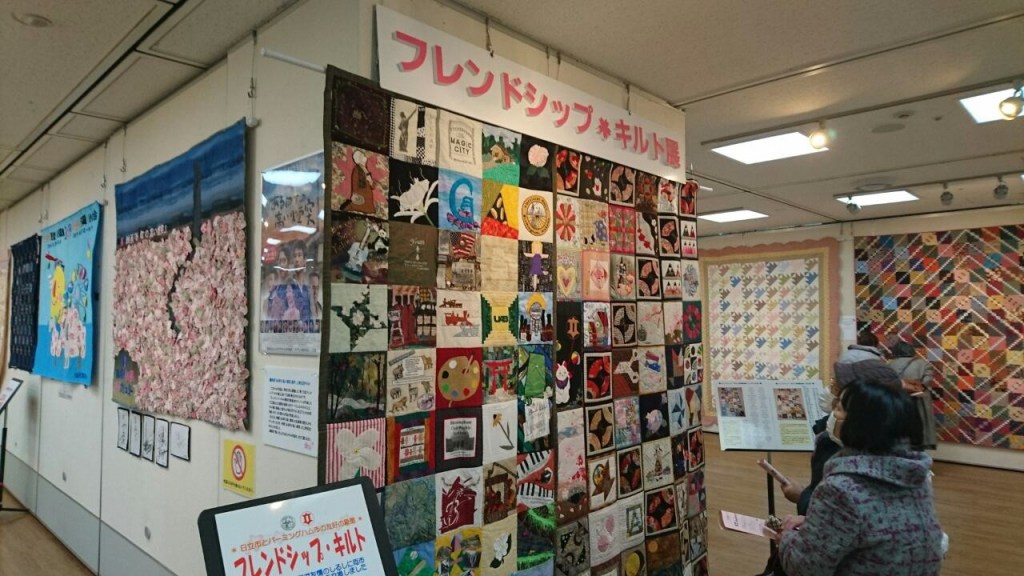
This week my quilt “Girls’ Room” or as I’ve sometimes called it “Sisters’ Room,” is on display in Hitachi, Japan. The city of Birmingham, Alabama and its sister city, Hitachi, trade quilts for one another’s quilt shows. This year I let Japan borrow my quilt for display. I also made a large pillow to go with the quilt, but decided against sending the pillow too. I wasn’t sure they’d have a place for it and didn’t want it to get lost. Regardless, this was a big thing for me personally. I hope the people in Japan enjoy seeing beautiful quilts from Alabama.
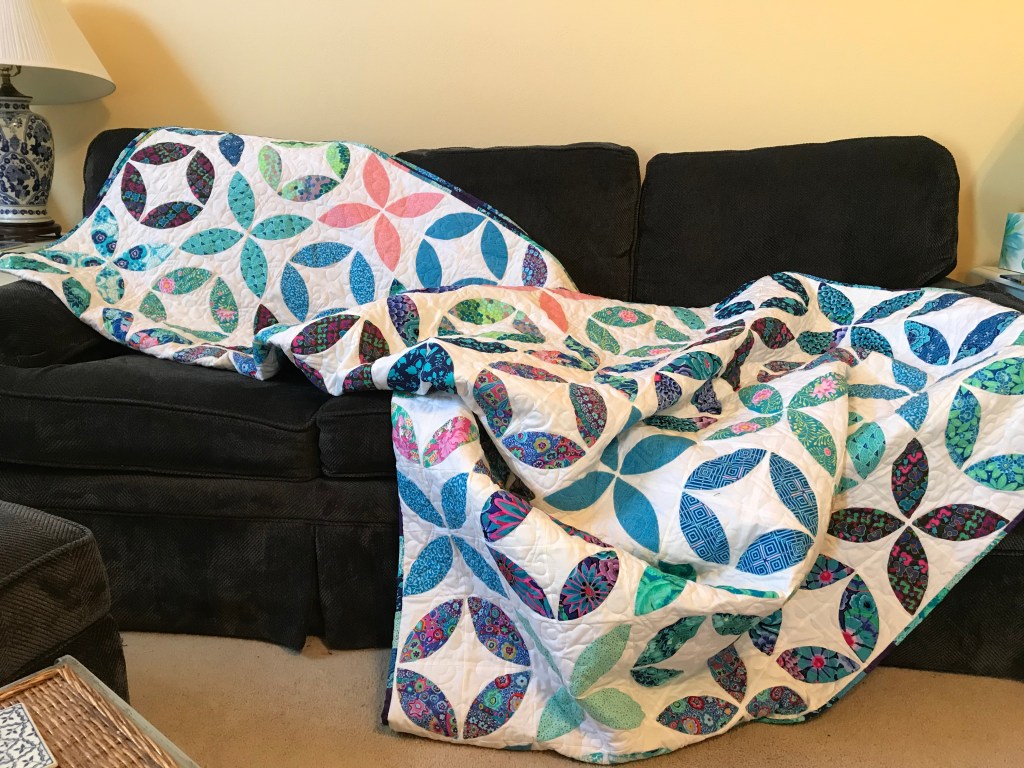
The quilt is made with cotton fabrics, mostly from Brenda Riddle’s “Windemere” line. (It’s my favorite fabric pattern of all time!) The background is a natural color from Moda and it’s sewn with Aurifil thread. The pattern is Cake Mix #2 from Miss Rosie’s Quilt Co/Moda. It is a variation of the bear claw/bear paw pattern and when used with these fabrics makes a soft look and feel.
The most difficult part of the quilt was that I ran out of 10″ stackers and had to improvise with the 5″ and try to stretch them out to fill in gaps. I had a particular size I wanted in mind, and I didn’t want to have to buy another layer cake (10″ stack) when I had charms (5″) in the same pattern. It was a test of my sanity but I made it work.
The scalloped edges were something I really wanted to try. If you don’t know me, you should know that math is not my friend. So there were a lot of marks with my water soluble pen that were “erased” and marked over and over and over until I was happy with the corners and spacing.
Another thing quilters don’t get enough attention for is bias binding. To those who don’t quilt, let me explain. You may think all the edges of quilts are the same. No, my friend, they aren’t! Bias binding is when you cut strips of fabric on the bias (angular) and then sew them together before putting them on your quilt, usually for rounded corners or circular quilts. It is much harder because when cut on the bias, it stretches. That’s the beauty of it too, I agree. So what happens if you use straight cut strips for binding? They will bunch up and have waves in it. It usually doesn’t lay the same way and is almost impossible to go over shapes like scallops.
I learned a lot with this one, and I hope the people of Hitachi are enjoying it too. I have a number of projects in the works, so I’ll try to be better about sharing them with you too!
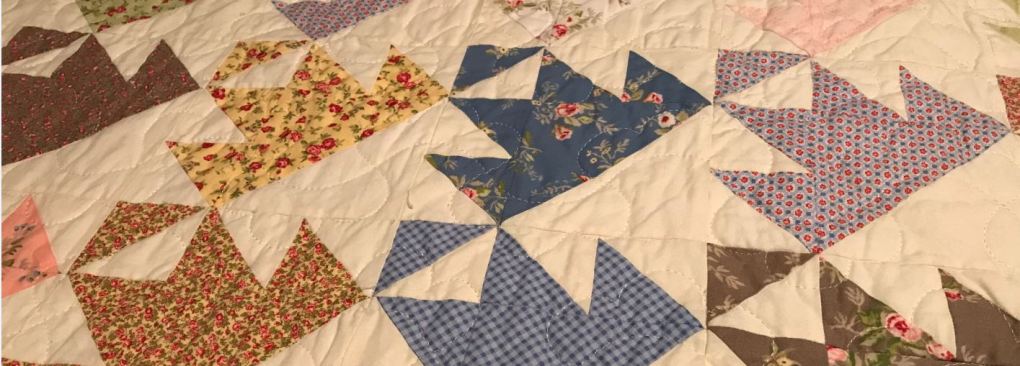
Ever pick up a project from years ago and wonder why you didn’t finish it? Then you start working on it again and realize EXACTLY why you put that project to the side? Enter this quilt. I started piecing it several years ago, when I was only around two or three years into quilting. I made umpteenmillion orange peel shapes (footballs) of both fabric and fusible stabilizer and bought at least six packs of Moda white five-inch squares. The fabrics I chose were quilt grade, name brand. So this project was not cheap.
Speaking of being, let’s say, frugal – I won’t go into just how cheap my dad was, but I inherited a small percentage of his cheapness and I couldn’t let all that money go to waste. I picked up the project and admittedly, said some words that might not should have been uttered. There was no going back. The orange peels had already been fused on the squares and most of them had been secured with a tight zig zag. I made lemonade out of the orange peels, as it were.
If you are ever interested in making one of several orange peel patterns available, let me give you a few key tips: make sure each orange peel is *exactly* the same. This matters, trust me. Also, mark on the square where the shape will be placed with a pencil or marker. Proper positioning of that little football shape might be the most important thing in making it turn out ok.
As for this quilt, I initially didn’t like it at all. My husband and daughter-in-law loved it. But when I look at it, all I see are mistakes. The space between shapes is too wide or too narrow. But I really did do the best I could with what had already been done – of that I am confident.
I also tried a new technique (seeing as how I probably couldn’t mess it up any more, right?). I cut little scraps of piecing and backing fabric into squares and then sewed them into a piano-key binding. I rather like the way that part turned out, and to tell you the truth, the quilt is kind of growing on me now.
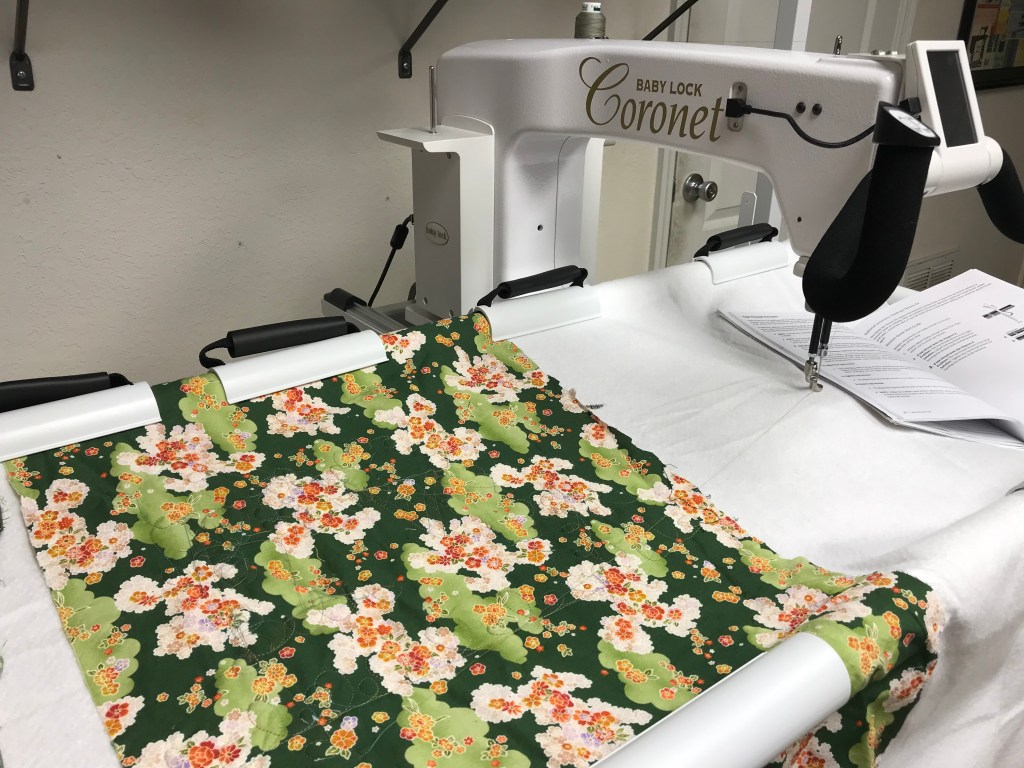
What did I do? I bought a small long-arm machine around New Year’s. I guess someone needs to make me a shirt that says “Old Quilt Lady,” similar to those “cat lady” memes. Behind the intention to finish my own quilts was also the fact that the long-arm quilters near me are in their 80s. There’s nothing wrong with this, of course, but I have to wonder if they will still be working in five years. So, this year I plan to work on learning how to free-motion quilt with this new machine.
I purchased (financed) a Baby Lock Coronet from a Birmingham store. If you aren’t familiar, it is the kind of machine people use to free-motion quilt, meaning a person basically scribbles with thread. You can make the machine go faster or slower, more stitches per inch or less. There are fancy add-ons for purchase as well, but for now, I need to work on lots and lots of scraps before tacking anything too fancy. If you’ve read my posts, you know that I always start with great expectations, then reality sets in and I have to buckle down. So I know my first quilt with the machine won’t be how I imagined it, but knowing I made the parts and then quilted the “sandwich” will be a personal triumph!
Southern Quilts: Celebrating Traditions, History, and Designs by Mary W. Kerr
At a recent quilt show I purchased Southern Quilts: Celebrating Traditions, History, and Designs by Mary Kerr ($30). Sherry Burkhalter, owner of Quilted Creations in Headland, Alabama introduced me to the book and I just love it. Sherry wrote one of the sections and several of her quilts, including those she collected through the years, are included.
The illustrations are beautiful and most of the quilts featured are antiques. The quilts were an inspiration – I wanted to try several of the patterns out. The abbreviated pattern histories provided interesting backstories to both familiar and unfamiliar works. I was particularly fascinated with several closeups of very old quilts. While gazing I imagined how each little scrap must have been used in a former life.
As the name suggests, many Southern states are included as the book is both educational and visually stimulating. Page after page resulted in vibrant, lovely quilts. However, I found myself admiring a quilt then looking at the caption only to see it was from the vast collection of one of the same few individuals. More often than not, the quilt provenance was unknown. Nevertheless, the book contained a great sampling of patterns from the South, including noted color schemes and materials.
My favorite section might be the one on the Alabama Pine Burr pattern. A 3-D kaleidoscopic quilt block, little pieces are arranged in such an intricate way that what may seem a bit messy looking to some is an awe-inspiring, sometimes gasping arrangement of quilting.
I hope you’ll give this book a look and share in the inspiration from other Southern quilters.
Let’s face it, the holidays are about giving. Mass marketers tell us we can’t afford not to miss out on the deals. Songs remind us of the joyful tunes we love singing along to each year. Cards are both heartwarming and confusing – how did she pull off that perfectly matched outfit for each kid? I firmly believe there are companies set on making us weepy with their holiday ads – I’m looking at you, Apple.
Sometimes our view of giving is what’s on someone’s list rather than what they truly need. So many people will receive gifts that will be abandoned within a few months, if not sooner. If you’d like to read more about this and a plan for reducing your spending while maximizing your holiday, visit the Buy Me Once page about gifting during the holidays. I have used a similar spreadsheet for years. I try to make or buy presents before December so I can actually enjoy being with people instead of stressing over what I haven’t done yet.
There are people who enjoy the gift and those who enjoy the giving. I’m the latter. This year, I tried something a bit different. Starting in January, I sent a gift, preferably handmade, to one friend a month. Sometimes it was large (a quilt) and other times small (a book I was finished with). The result was the same. Each person said “thank you for thinking of me.” I’m not stating this so you will think any better of me. My intention was to spread the feeling of Christmas (or whatever holiday you observe) all year.
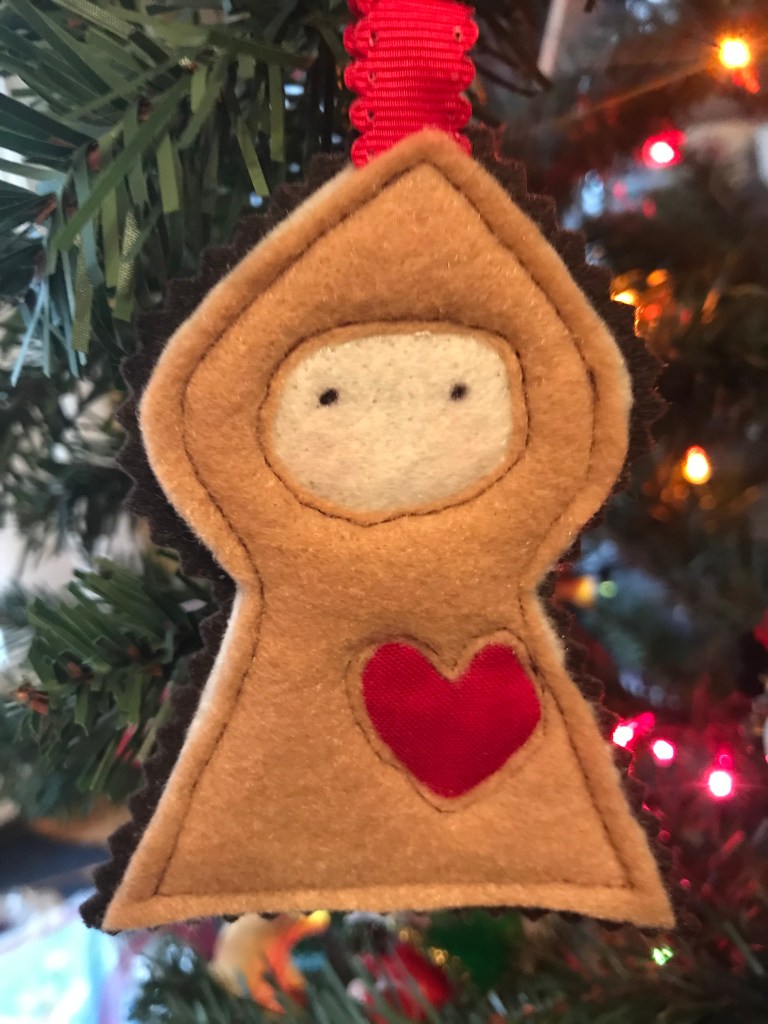
If you are so inclined, try this yourself. It doesn’t have to be a purchased item. I made ornaments from scraps and some from leftover cross stitch projects. You don’t even have to be crafty. Calling someone to check on them or asking them to lunch is so much more rewarding than a three-second text.
If you are still searching for the right gift, remember – handmade is best. If you aren’t able to do that, let your gifts be heart-felt and meaningful. This quilting blog and the research for the book has made me more thankful for the people around me. I am thankful to you, the reader, for your feedback and support.
Most adult-aged people have a 9/11 story. If you will indulge me, I’ll share mine. I was on my way to work and heard radio deejays confused but laughing at the news that a plane flew into the World Trade Center. I won’t repeat what they thought happened, but the reality was definitely much worse. When I got to my (still relatively new) job, I quickly asked if we had a TV. Why? My coworkers knew nothing. We found the only one in the building and spent the rest of the day shifting between calling people and sitting in front of the TV. I can still see a plane flying into the second tower live on the screen. Worse, I remember the people jumping from the skyscrapers – men in white shirts and suits, women in printed blouses and dress shoes. A coworker asked why they were jumping instead of waiting for help. I knew. I couldn’t say the words out loud.
Part of me is sad for today’s youth, because they don’t know how it felt to come together like we did in the days following 9/11. The other part of me hopes they never experience anything like this. However, it is so important to remember and keep the lives of those who perished in our minds each 9/11. Every first responder reporting for duty knew they were doing the job they hoped they would never have to perform. This is a day they will never forget.
In sort of a segue, I wanted to encourage you to visit Quilts of Valor. Their website is https://www.qovf.org/. Quilts are given to veterans and must adhere to a strict set of guidelines. Although I have friends who have participated, I have not yet made a Quilt of Valor. I hope to in the next few years.
If you have thought about making a any type of quilt for someone, don’t wait. Don’t be intimidated with your skill level. When I make a quilt, my first thoughts are usually how many mistakes I made. But I can remember each one. And it makes me better every time. To your recipients, they only remember that you cared and put your heart into each cut of the fabric, stitch of the seam, and press of the iron. Show some love and get quilting!
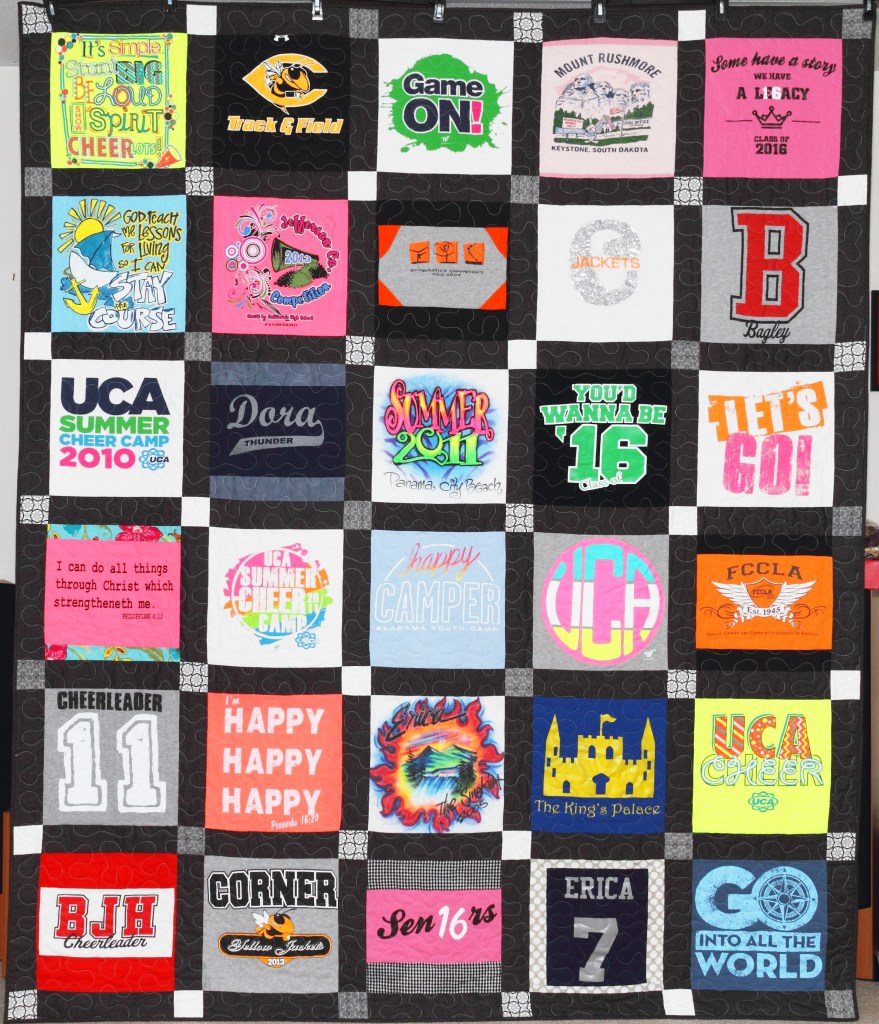
Whoever started the memory quilt movement was a genius! Completed in a variety of ways, they are usually comprised of shirts (t-shirts or dress shirts) sewn together, maybe with sashing. They can be made as a “quilt as you go” or traditional style quilt. I had always thought they needed to be sewn just like traditional quilts until several ladies told me they use a sheet or flannel as batting to make the quilt lighter. Quilters are some of the most creative people I’ve ever met.
If you don’t know a quilter, find one – we are a friendly group! Or box up the shirts, send them off, and get a quilt in the mail (i.e. Project Repat).If you’ve ever thought about making one or having one made for you, don’t wait! You paid good money for those t-shirts – invest them back in a memory quilt.
Through the years I have made several memory quilts for other people from a variety of materials to celebrate different occasions, including baby, high school graduations, and a police retirement quilt complete with badges! Below is the first t-shirt quilt I made, for a very special high school graduate.
Thanks for following –
Beth
P.S. I hope you can keep a secret – I’m holding back clothes from my youngest son’s wardrobe to use later. This way I can use some of his dress shirts for framing and sashing.
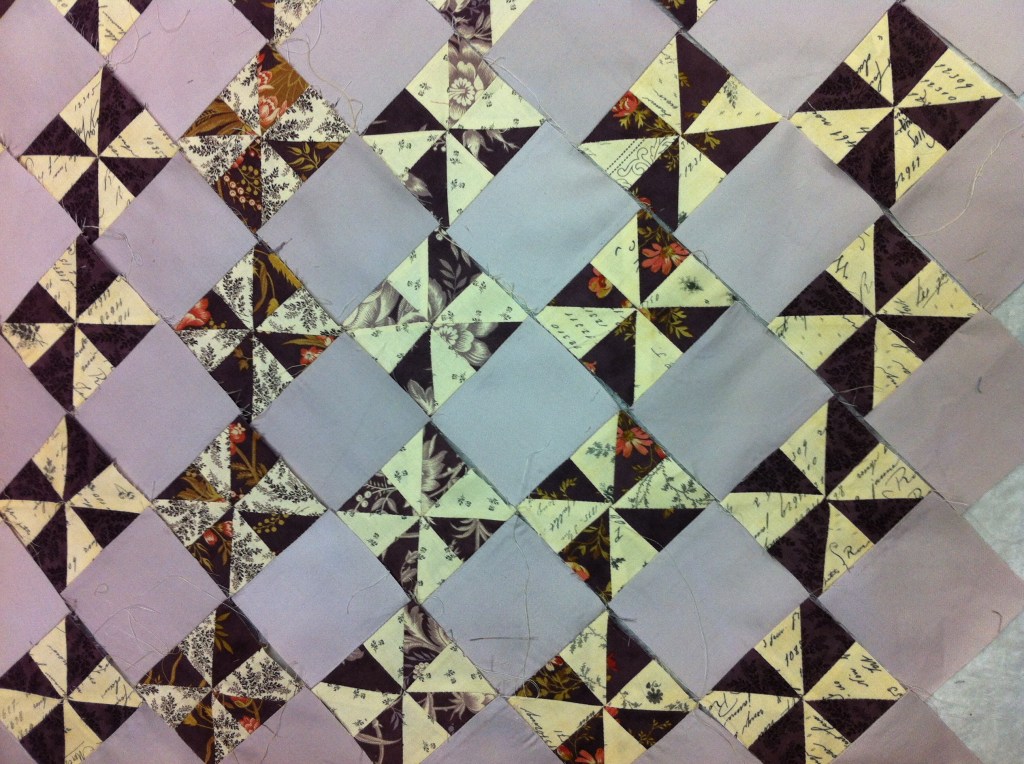
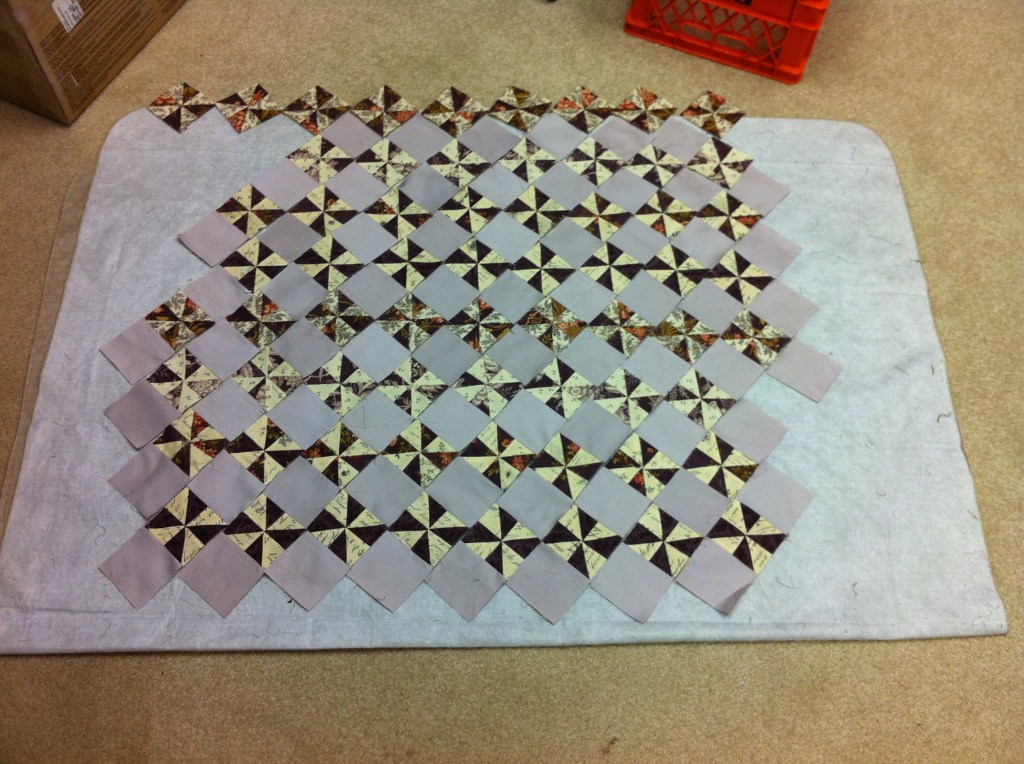
I don’t know about you, but I love starting new projects! I confess that I always get so excited about how awesome it will look before the first stitch is sewn. Nothing great just happens, and trust me, I’ve made some super messes from what I thought would be easy. Take these images for example. After seeing something similar I thought, hey, it’s just a bunch of pinwheels sewn in strips – what’s so hard about that?
Follow through should have been my friend and pointed out that using all those tiny pieces, and they were all different fabrics (except for the grey background) would be challenging enough, but add to that, I’d never made anything on point before. It took a few years of give ups and restarts, but I recently finished it.
Luckily there are only a few parallels between this quilt and my latest ambition. I’m writing a book about Alabama quilts, focusing on all 67 counties. When conceived, it sounded quick, easy, and fun. It’s still fun, but a bit more intensive than I originally thought. It will be great, but take a bit longer, and that’s ok because I hope to hear some really great stories along the way. So far, I’ve been amazed at the quilts out there, hidden in trunks, attics, and closets. But the stories are even better!
I’d like you to be a part of this project too! Let me know if there’s a fascinating story and/or quilt in your county. It doesn’t have to be old or new, traditional or modern, it just needs to have some connection with something in the county.
I’m looking forward to sharing some of these quilts with you online, but I hope you’ll read all 67 when the book comes out!