First of all, sorry. I’m sorry it’s been a long time since I posted. I dislike the phrase “In all honesty,” as if you weren’t being honest to begin with, but that’s the best phrase I can think of at the moment. To be honest, working on all things quilts is fun but I have limited time to devote to it. I’m trying to squeeze in more time both to quilting and researching. With Covid, I pretty much stopped traveling for quilt-related things, either because I didn’t want to get out or the people and places I wanted to visit were closed. Now that much of the world has a new normal, I’ll start traveling, writing, and speaking more.
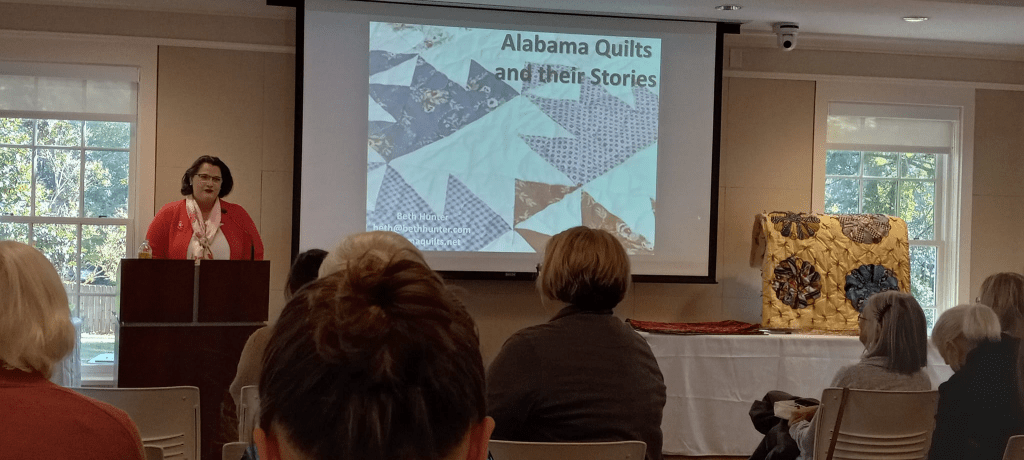
For an update, I taught two ladies how to quilt in my home studio. I finished a few quilts and had several items in a quilt show this year. I am working on an extended charity project. And I’ve spoken to a few groups via Zoom or in person about quilts in Alabama. The last engagement was at Pebble Hill in Auburn. There were so many beautiful quilts and talented speakers! As an added bonus, I was able to see several friends from around the state while I was there. Below is an image from my talk at Auburn’s Pebble Hill.
The more I research quilts in the state, the more I realize what limited availability people had when choosing fabrics, batting, threading, and trims. Before the mid-20th century, most of these supplies were what was already in your house or what you could swap with a neighbor. Even stores filled to the brim with dry goods may not have quality fabric or batting. So many quilts from my grandparents’ age are gone, I suspect, because of inferior materials and hungry insects. And that is a tragedy –imagine all the patterns and color waves we miss never having seen them.
So when I come across a particularly interesting quilt, I want to share that story. And that’s really what this blog and my (hopefully one day) book will be about.
You may have seen the news recently about an elephant statue in Birmingham called Miss Fancy. There was also an article on the same news site, including my contribution to the Encyclopedia of Alabama. Prior to these, there was an Alabama Heritagearticle written by the fabulous Jim Baggett, and now there is a book about the elephant by Irene Latham. Y’all, Miss Fancy is popular!
If you don’t want to read all this but want to know the story, I’ll break it down in quick fashion. In Avondale (suburb of Birmingham), there was a little zoo. People in the area wanted to grow the zoo to include an elephant. With support from various organizations, including a kid’s penny drive, their dreams became reality with the addition of Miss Fancy the elephant. While in Avondale, she delighted young and old with her escapades. She often went to the playground to let kids ride her and in return they’d share their lunches. Miss Fancy also liked to wander around Avondale, surprising people by looking in their windows. She had a handler, yes, but believe it or not, Miss Fancy liked to slip away. Due to Miss Fancy’s stomach ailments, it was suggested she ingest liquor as treatment. Her handler also helped himself to the alcohol, so there were times both Miss Fancy and her handler were, as we say in the South, drunk as a skunk. If you’d like to know more about Miss Fancy and what happened next, click on one of the articles above.
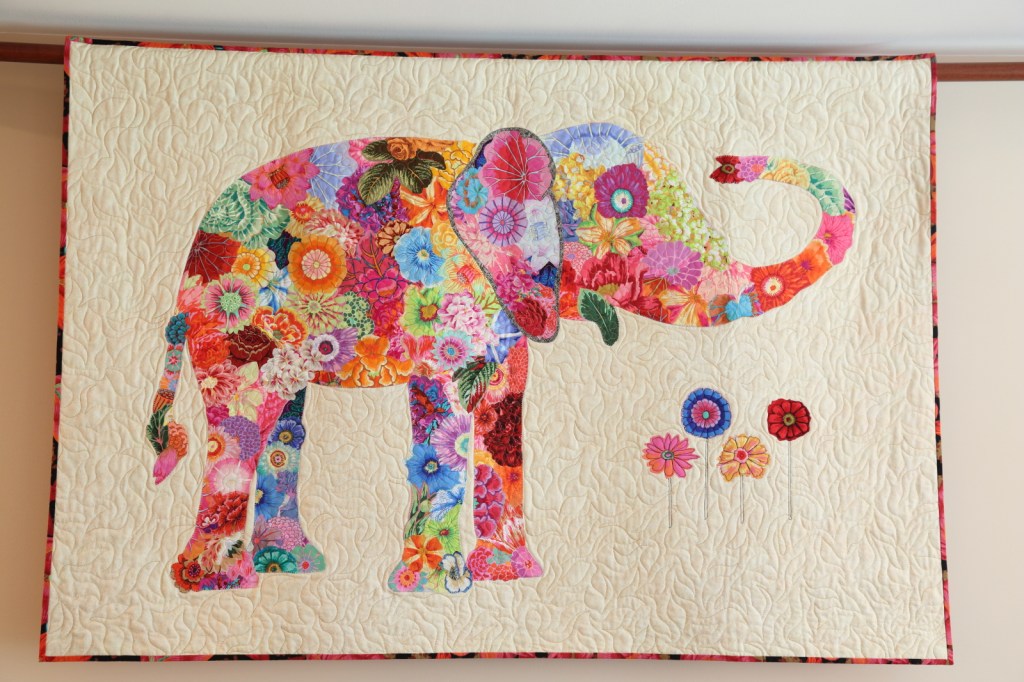
When I was trying to find a quilt to represent Jefferson County for my book, I wasn’t sure what I was looking for, but I knew that when I saw it I’d know. And that’s exactly what happened when I saw Art and Ruth Ann Abb’s work called “Miss Fancy.”
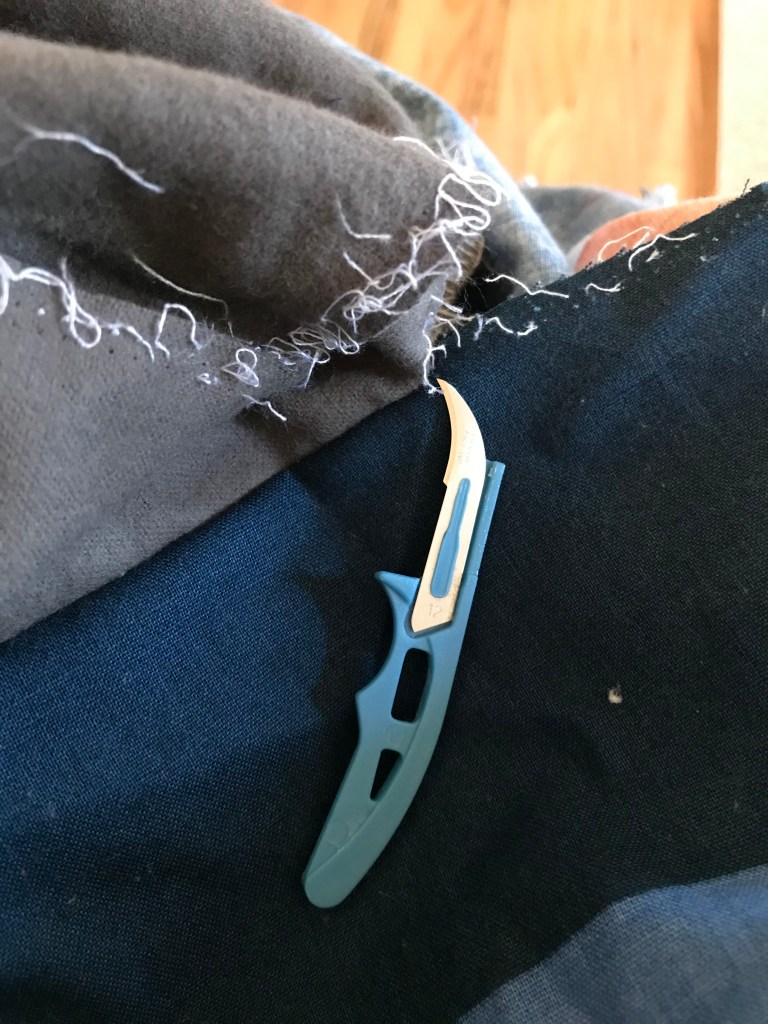
“Picking” and “grinning” are two words you won’t hear quilters say in the same sentence. We’ll leave that to country musicians. Picking out stitches can be aggravating in the best of times, but have you ever tried to pick out serger stitches? Ugh! You start to think international peace treaties were written and signed in less time than picking out three sides of a serged quilt that accidentally had a fold or the fabric doubled over.
I found this little blade to be very helpful, and at times I’ve resorted to my X-Acto knife. (No judgement!) There are a lot of stitches in a small area, and the stitches hit the fabric both horizontally and vertically. Will this deter me from using my serger to quilt? Nope. Due to the nature of how sergers work, quilters achieve a nice, clean finish with a sturdy set of stitches in a shorter amount of time than using a domestic machine. Sergers work particularly well on projects like the quilt above: a panel on the front and flannel on the back.
Secretly, I also enjoy the power of the serger. I feel like one of those people with high-powered sewing machines zooming away when I use my serger. Zip – that side is done. Zip – the next side is done. It’s beautiful! (Except when you mess up) My sewing machine is good, but if I tried to run stitches that quickly, in short order something would go wrong.
Sergers may be obtained quite inexpensively, with the base models (like mine) under $300. The sky is the limit depending on what functions and brands you desire. I bought my Janome base model from Hancock Fabrics years ago, and don’t regret that purchase at all. It has come in handy with all sorts of projects, including clothing repair, home goods, and sewing everything from wearables to pillows. Let me know if you want to see how sergers work and I’ll post a short video. No promises on anything being clean in my sewing room.
Hope you are all staying well, safe, and enjoying new projects.
Did you know? Alabama became a state on December 14, 1819. Today historians celebrate Alabama’s rich history (both the famous and infamous) in a variety of ways. Textiles play a role in this history, as members of the Alabama Department of Archives and History explain in the video below (scroll down). Both of these ladies are incredibly knowledgeable about textiles, Alabama history, and are genuinely sweet people.
Last year my family participated in Alabama’s Bicentennial in Montgomery. While it was a bit wet and cold, we loved being a part of this history. This year, I’ve been reading more about Alabama with a series of books. Most of these (see list below) include quilting and textiles in telling Alabama’s history. If you want a quick Alabama history fix, visit the online Encyclopedia of Alabama (http://encyclopediaofalabama.org) and the fantastic magazine Alabama Heritage (https://www.alabamaheritage.com). Santa is supposed to bring me this book: Alabama Quilts: Wilderness through WWII, 1682-1950 (https://www.shopalabamaoriginal.com/shop/Alabama-Quilts-by-Mary-Elizabeth-Johnson-Huff-and-Carole-Ann-King-p239040205). I promise, I’ve been good this year!
I completed the Martha Pullen online teaching license and received my certificate today! You may notice on the home page there is now a Martha Pullen logo. Hooray!!!
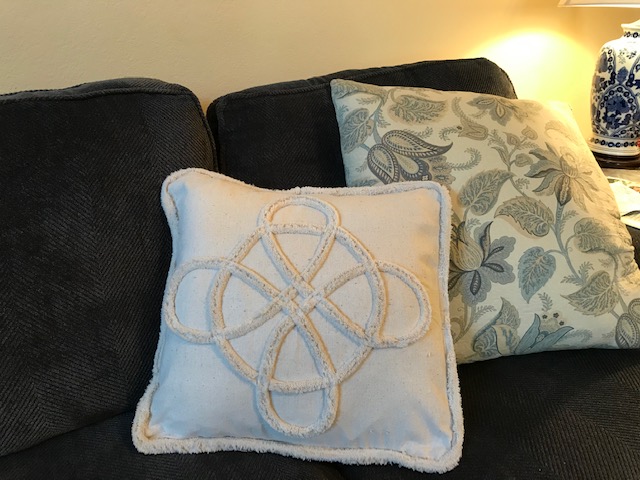
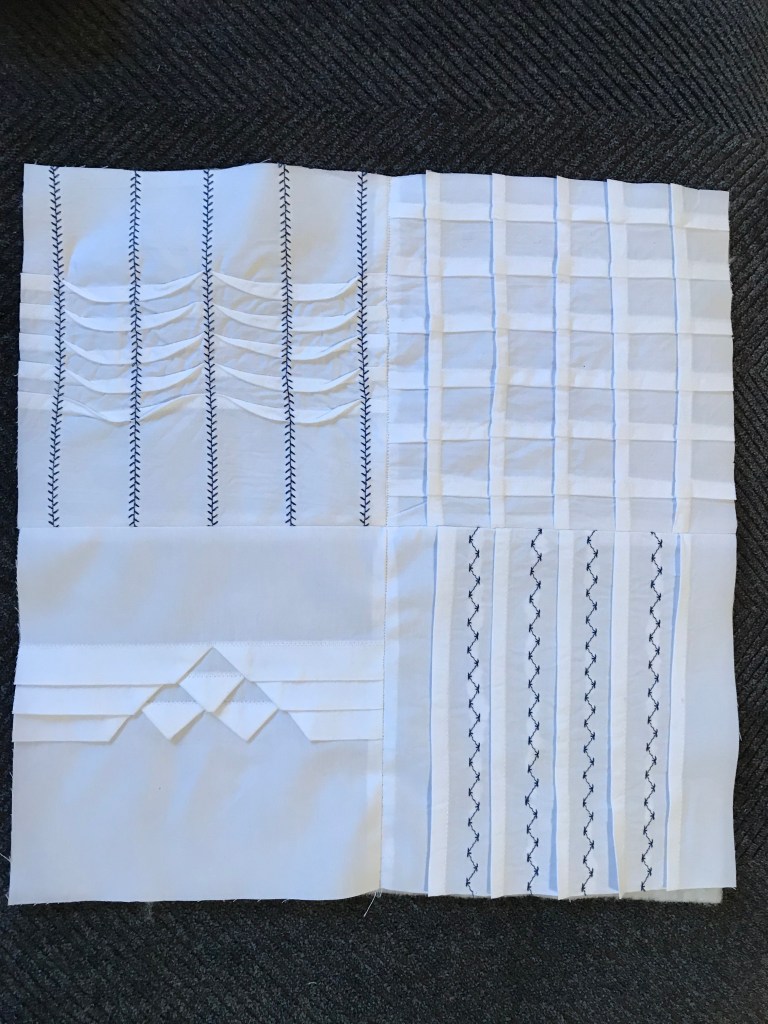
In an earlier post, I stated I had two more projects to go until the class was completed. I wanted to share them with you and let you know what I did right and wrong. Believe me when I say if I can do it, you can too. If you want to embark on these projects, let me know and I’ll try to help. The second to last project was this pillow with a Celtic design. The pillow form is inserted and there are buttons and button loops on the back. The pillow cover is made of muslin and the decoration is chenille, which is made using osnaburg fabric. There is a template for the design, but it is tricky. First, the fabric is a tan color, so harder to see through the fabric to the template for tracing. I managed to do this well, but when I make more, I’ll use tracing paper between the fabric and template to make it more precise. Another issue is the direction of the decoration. You might not be able to notice, but there is an over-and-under pattern to it, so it can sometimes be difficult to manage with the thick osnaburg bias strips. Last, I didn’t quite understand the instructions on the outer trim and did it my way. I enjoyed learning how to make the corners better (not too pointy and not too rounded). This is a project that I hope to repeat many times. It is so enjoyable to make the chenille, and because they are bias strips, they are so easy to shape.
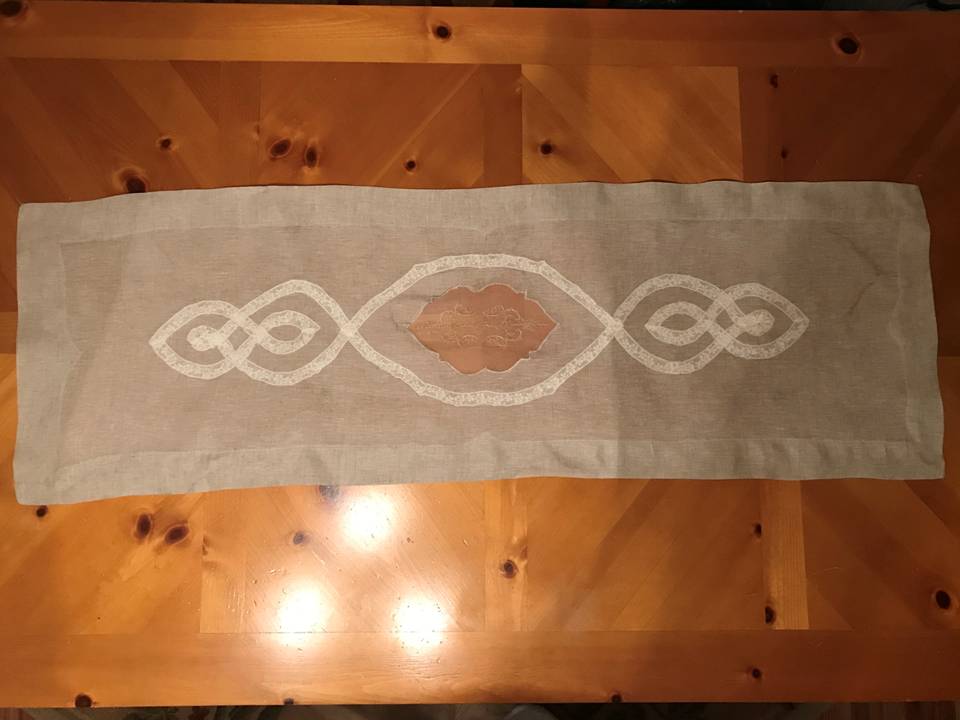
The last project, a table runner, was much more challenging. This handkerchief linen had to be starched several times before it was stiff enough to work with. Again, I should have used tracing paper to transfer the design on the linen, but I chose to put the pattern underneath and trace as best I could. I’ll know better next time. The first steps include using organza as the base for embroidery. Then it is placed on the linen and satin stitched in the traced design. After removing the linen from behind the organza, it has a nice windowpane effect. Unfortunately, I nicked a spot (pretty sure you can’t tell) and there’s a tiny hole. Trust me, it is very easy to do. I also used a washable pen for most of the transfer work, but decided one part needed a regular ink pen because it was easier to see and I believed it would be cut out of the final project. You can still see the ink on that one spot, but I am sure with a few washings, it will come out.
Then comes the lace shaping. Despite having watched the video multiple times, I had hoped the lace shaping would have come out a bit better. One part of the lace shaping got a bit wobbly. I still think it’s an awesome first attempt, and I’m proud of what I learned. The last part was what I thought would be the easiest, but of course, it was more difficult than I thought. There is a special way you fold the corners under, then sew and cut off the excess. After that, you use a wing needle and choose a stitch you like to finish it. I enjoyed this part, and working with the wing needle is very cool! I will definitely use both the fold-under corners and wing needle again on future projects.
If you are on the fence about taking a Martha Pullen class, please contact me. It was on the expensive side, but I learned many new techniques. Additionally, there were several fabrics I had never worked with. Both of these gave me more confidence. Some of the projects in the class were mandatory while others were from a group you could choose from. For example, one project needed to be from the heirloom group. Most of those options were children’s items with lace, ribbon, and specialty techniques. Since I don’t have small children and don’t foresee grandchildren anytime in the near future, I chose the table runner. It had several of the same techniques. There was also a potpourri category, and I chose the Celtic pillow. I just loved the look of it. Overall, I’m very happy I enrolled in (and completed) this course.
Next projects: 1) Currently I’m making things for a neighbor out of her mother’s old quilt squares. Her mother passed away recently, and the three daughters would like something to remember their mother by, so I’m making pillows, a table runner, a small quilt, and more out of their mother’s work. 2) I’ll continue teaching at Burritt on the Mountain. The holiday stocking project went well. The next class (January) will be a round table topper with Valentine fabrics. 3) I’m also going to put one of the patterns I purchased during Black Friday week to good use. My first attempt is going to be a spring top. You’ll have to hold me to this so I don’t chicken out. No matter how much they advertise “Easy” or “Very Easy,” I still find patterns intimidating. Hope you have a great end of the year, and a much better New Year!
It happens every year. I start by warming up my typing fingers and staying up later each night until I’m ready for the 12:01 am cyber deals. It begins the week of Thanksgiving with spurts of deals here and there, followed by the double whammy of Black Friday followed by Cyber Monday.
As a sewist, online shopping is my friend (especially during a pandemic). Sometimes I feel like I struck gold (BOGO thread!). Are these deals too good to be true? I admit I fall victim to the excitement of getting a new notion and have been known to get a bit carried away. So this year, the year of… well, how shall I say this, the year unlike the others, I expected more. I kind of felt like sewists deserved more this year. Bring on the unbelievable sales! Bring on the pennies-on-the-dollar deals! Give me the “act now before this closes” line with the deal of the sewing century! Was that too much to ask?
For some reason, I’ve been taken off the Willy Wonka golden ticket list at JoAnn’s and stopped receiving their Black Friday (let’s call it Black Week) flyer in the mail. Some of you will think, “why not just use the coupons online,” and you’d be right. There are coupons online. But the BEST coupons go to the people on the Wonka list. I received them for years and poof, off the list. From their website, I did purchase a few notions, and while I didn’t NEED any of them, I know I will enjoy them. I wanted more spray starch by the gallon, and they really did have a good deal on that. Later, I convinced my husband to accompany me to our nearest JoAnn’s (about an hour away) on a very rainy Sunday. I felt the call of discount patterns. Sure enough, there weren’t many people willing to brave a thunderstorm with buckets of rain for the sake of a few bucks off their sewing needs. And we didn’t remember an umbrella, so we stayed cold and wet for most of this adventure. We joked and said maybe going during the Iron Bowl might have been a better time. (Next year!)
The discount for patterns helped a lot, but what in the world happened to pattern prices? One of the Vogue patterns was originally $33! Depending on what you are making, the pattern is as much as if you bought a ready-made garment. When the nice, masked lady at the plexiglass-shielded register rang me up, she said with confidence that I’d saved more than I’d spent. Between us, I think she was just trying to make me feel better. Or maybe she was trying to make my husband feel better since he was standing behind me umbrella-less at the register.
The end result was three patterns, some trim, and a few yards of boucle fabric. Boucle, I found out, is pronounced boo-clay. I won’t even begin to tell you how I Southern butchered the pronunciation. Let’s just say I was thankful I didn’t ask for the fabric by name at JoAnn’s. They might have thrown me out and taken away my coupons.
If you are like me, you’ll agree the best gifts are homemade. I love when my sister (who is a baker) creates something special each Christmas. I know the pie or cake is for everyone, but I always feel like she made it just for me. I routinely give homemade gifts, sometimes it is quilted, sewn, or cross stitched. I feel like I am giving a piece of myself with each gift.
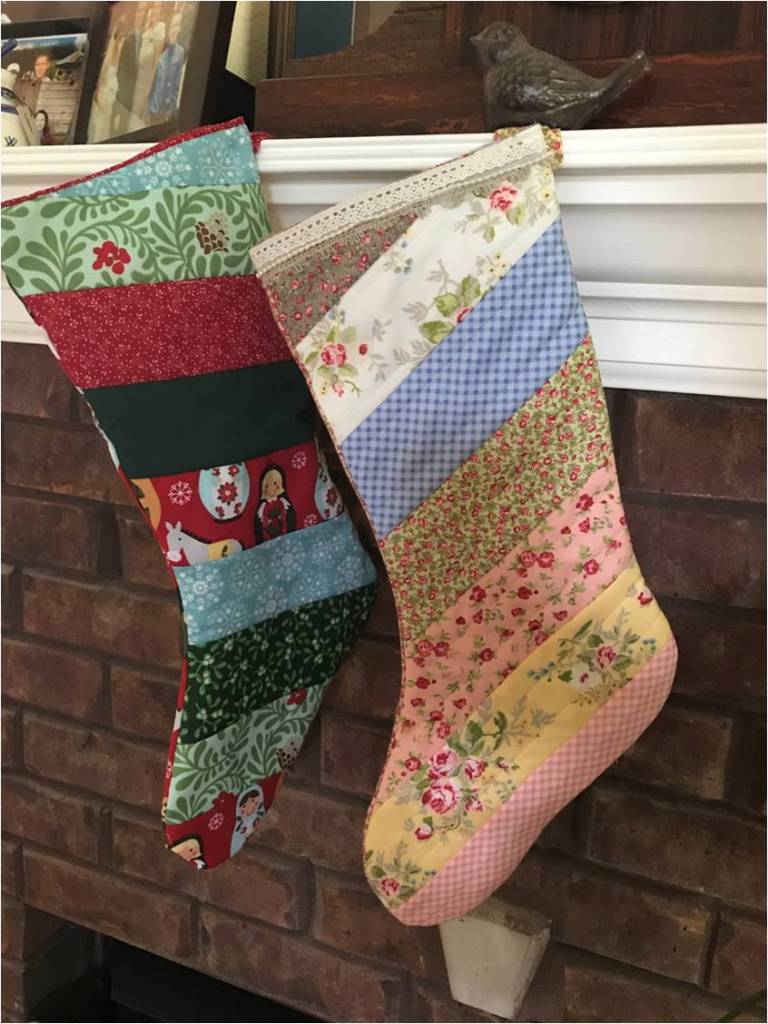
Want to learn how to make gifts for the holidays? I’ll teach a class at Burritt on the Mountain (Huntsville) on November 14th from 9:00 am – 2:30 pm. You can read more about it here: https://burrittonthemountain.com/event/quilting-holiday-stocking/. Samples of what you’ll make are in this picture. We’ll use fabric strips, batting, and embellishments. You can create your stocking in any direction. I used diagonally up and down in these samples, but you can also go straight across or up and down. The pink, flowered one has additional quilting lines, while the green and red stocking is left plain. Most of the supplies are included with the fee, so that you can show up with a sewing machine (or share one) and start working. When you leave, you’ll have a finished project. But the best part is when you are home, you can make more because you will have the skills. You can add a monogram, all kinds of embellishments, and fabrics.
I hope you find projects to start for the holidays. There’s nothing like looking back on homemade gifts and remembering how much love was sewn into each one.
While this summer has been a bit depressing (thanks, pandemic), I’ve been super busy with a number of projects, especially sewing. At the end of May, I decided to take an online class with the Martha Pullen Company. Never heard of Martha Pullen? She is the Martha Stewart of heirloom sewing and lives in Alabama. She had her own sewing show on PBS for years. Knowing I am a fan, a friend who works in textile archives gave me a tour of Mrs. Pullen’s collections. Inside each archival box was a fabulous creation of Martha Pullen or an item she purchased while in Europe or at estate sales. She collected works from around the world so she could recreate them, and she did so quite successfully.
The class I’m registered in consists of a number of projects, each varying in skill and techniques. Some of the projects I dreaded and others I was excited about. What’s funny is that when I actually made them, I found I really liked some of the new techniques and they weren’t so bad after all. I think this is true for a lot of projects — daunting and somewhat unfamiliar, so we put off trying. Then when we are forced to, we wonder why we didn’t try it before.
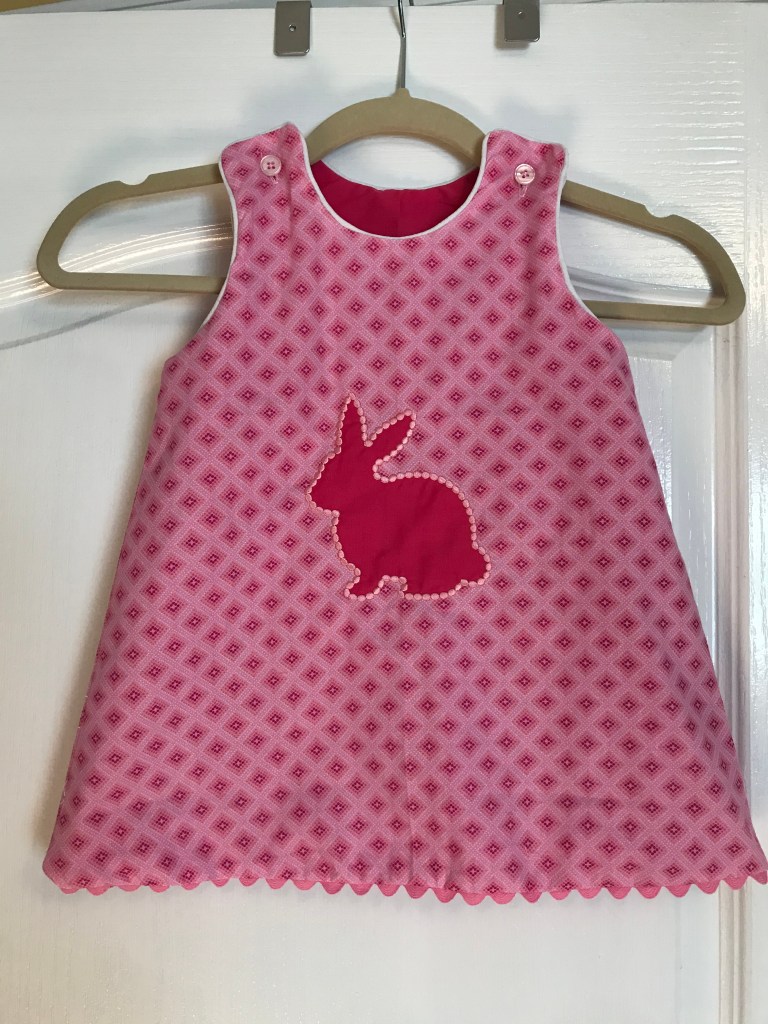
Here are a few of my finished projects, including this sweet little dress. Having three boys, I didn’t make any dresses, so this was especially fun for me. New techniques included curved piping (I still hate it, sorry), using the buttonhole attachment on my machine (why did I resist trying this – it’s awesome), and ric-rack trim on the bottom to create a scalloped hem. If any little girls come my way, I would love to make more of these dresses.
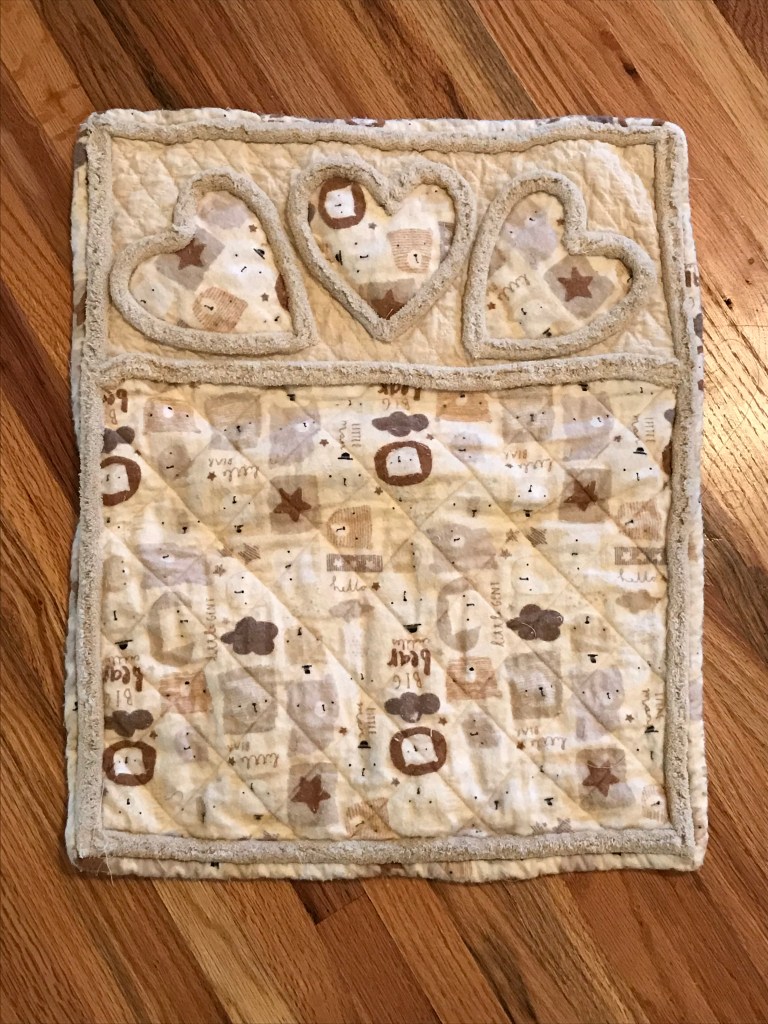
This is a super soft, flannel doll quilt with chenille hearts. New techniques included making the chenille (yes, you read that right – I made the chenille and loved it), shaping the chenille, working with pre-quilted batting, and creating a diamond pattern to quilt the lower half. Applique was used for the heart insets.
The sample quilt provided in the instructions had many blocks, but we only had to choose four and show off the new techniques learned. I’ll admit the squares I thought would be a breeze turned out to be super frustrating! The needle broke, the thread broke, the bobbin thread nested, it curved instead of staying straight, etc. Once I cut the fabric too short and didn’t realize it until I had a great sample and had to start over again. The one square I thought would be hardest was the easiest and I will definitely do it again. Making sharks teeth (lower left square) was pleasant and very satisfying. I’m glad I learned this technique.
Maybe my favorite overall project so far is this baby quilt. It’s made with super soft cotton batiste for the white fabric and baby blue gingham on the other. I thought this would be easier, but again, I learned something along the way and will make this again. Hopefully this will be a class I teach one day. There is machine embroidery on each corner and the batting is white cotton flannel. It’s made with a template circle and each circle sandwich is sewn and then sides folded to create a cathedral window look. The hardest part is making sure the exact points fold over to meet the next piece correctly.
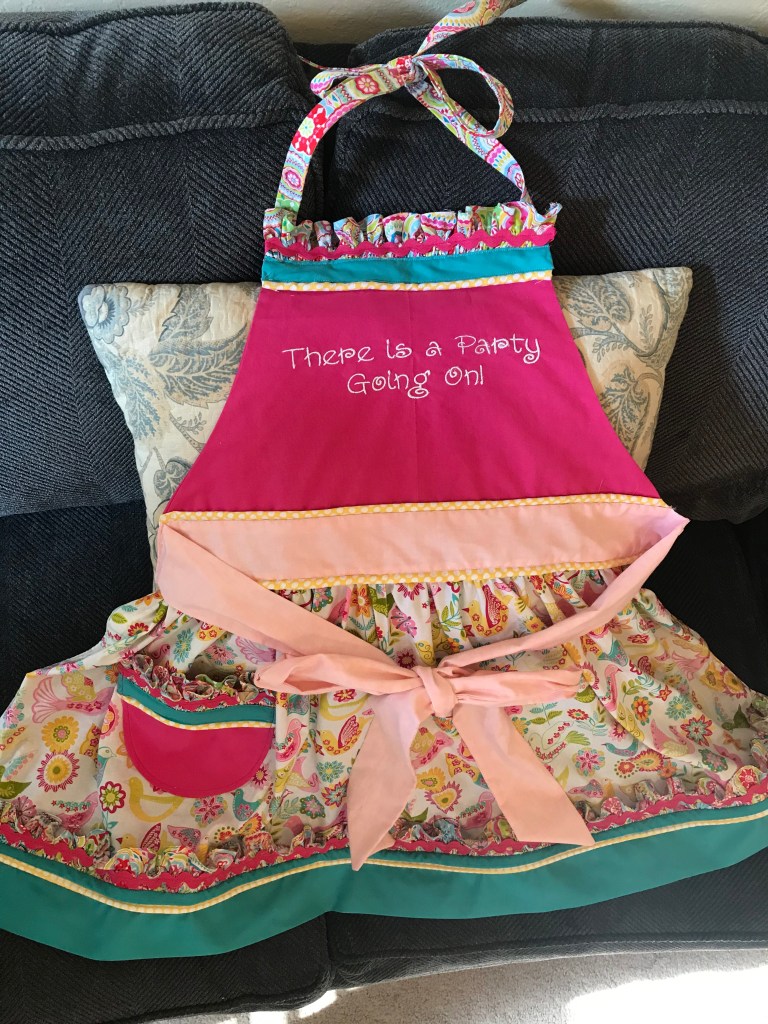
Last, but certainly not least, is the party apron. Again, I have sewn things I actually wear out in public, so this project didn’t seem too difficult at first glance. In truth, this is a heavy apron because I used so much glue on it to stabilize the ric-rack and in some piping areas. I’m fairly sure it will not wash out, but you know, there was a point I didn’t care if it was held together with superglue. Multiple fabrics were used (all cotton). While there weren’t “new” techniques to me, there were definitely new ways to incorporate these. I’ve made ruffles before, but this was a looong strand of ruffles for the bottom and it was suggested we use our sergers for this. I had a talk with my serger and he refused to work on the project. He’s an old school machine and is really only willing to serge things that will not be seen later and agreed to work on the ends as long as I folded the hem up. I was able to use a new foot that made a beautiful, tiny hem. And I purchased a knock-off gathering foot for my Pfaff to help with the ruffles. I will use both in the future. Again, I had to make my own piping and bias cut some of the trim. The hardest parts were keeping everything straight and knowing which pieces to sew to which so that the back of the apron didn’t look like a string-fest. I admit I didn’t follow all the directions on this as I wasn’t happy with the sides being tucked over. I added a bias strip of the yellow polka dot fabric to the back sides for stability and looks. I’m glad the “party” is over for this apron.
I’ve got two more projects to go and fingers crossed, will pass to become a certified teacher. Please share what you’ve been working on this summer and your plans for the fall too. Thanks for reading! Hope you stay well! — Beth
Oh my goodness! You will not believe where I went this weekend.
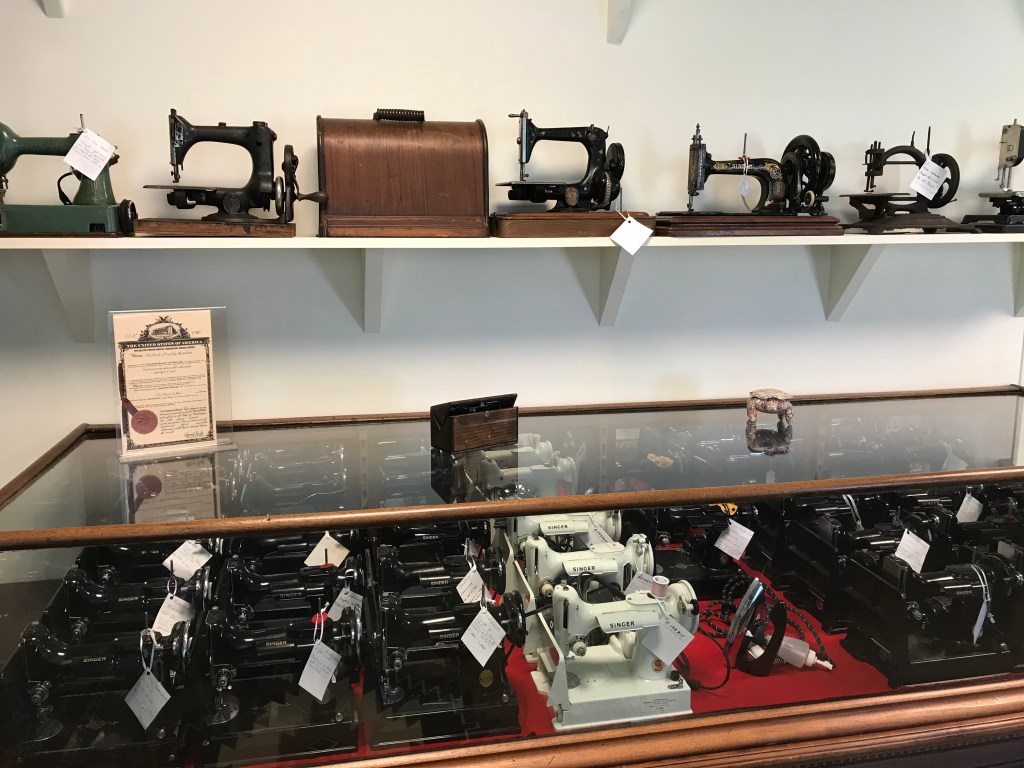
A very sweet lady near Guntersville, Alabama has a little building behind her house FILLED with antique sewing machines – seriously, over 200 old sewing machines. It was such an incredible trip!
After talking with the Guntersville Museum, they put me in touch with the lady and we chatted on the phone. I could tell immediately we were kindred spirits. I’m much more a phone person than a texter, as is she (I want to hear inflections, not read emojis). Obviously we both love quilts and quilting. When my husband and I pulled up to her house, there was a sign indicating her driveway was not a turn around. I was already in love with her and hadn’t even met her. We were of one mind.
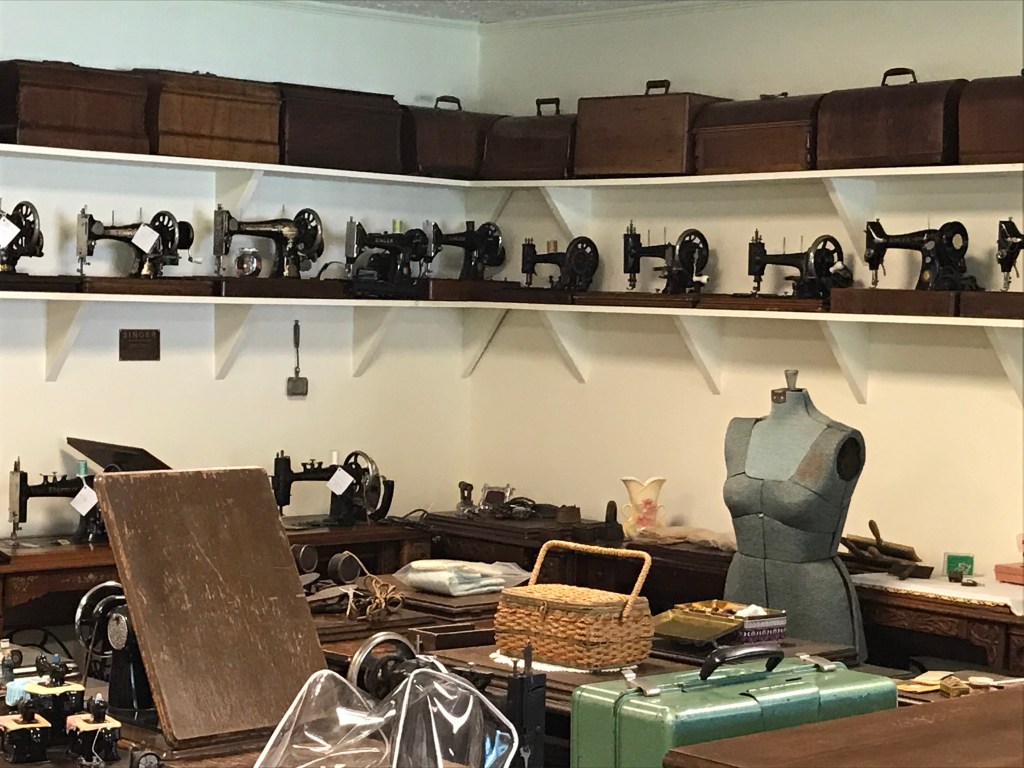
First we signed the guest book and then attempted to take in all the sewing machines. It was overwhelming. I believe most still worked, but many of them required finesse to start. The earlier machines dated to the late 1800s, and were true representations of craftmanship. There were treadles, cranks, pedals, and wheels. I soon realized this was a museum, not a back building.
Slowly I felt as if I was in a sacred place, where iconoclastic metals of the past gleamed once more. There were machines, tools, notions, sewing cabinets, spool cabinets, and much more. Had I not traveled to see her, I might not have ever come across this many antique machines, and so well preserved.
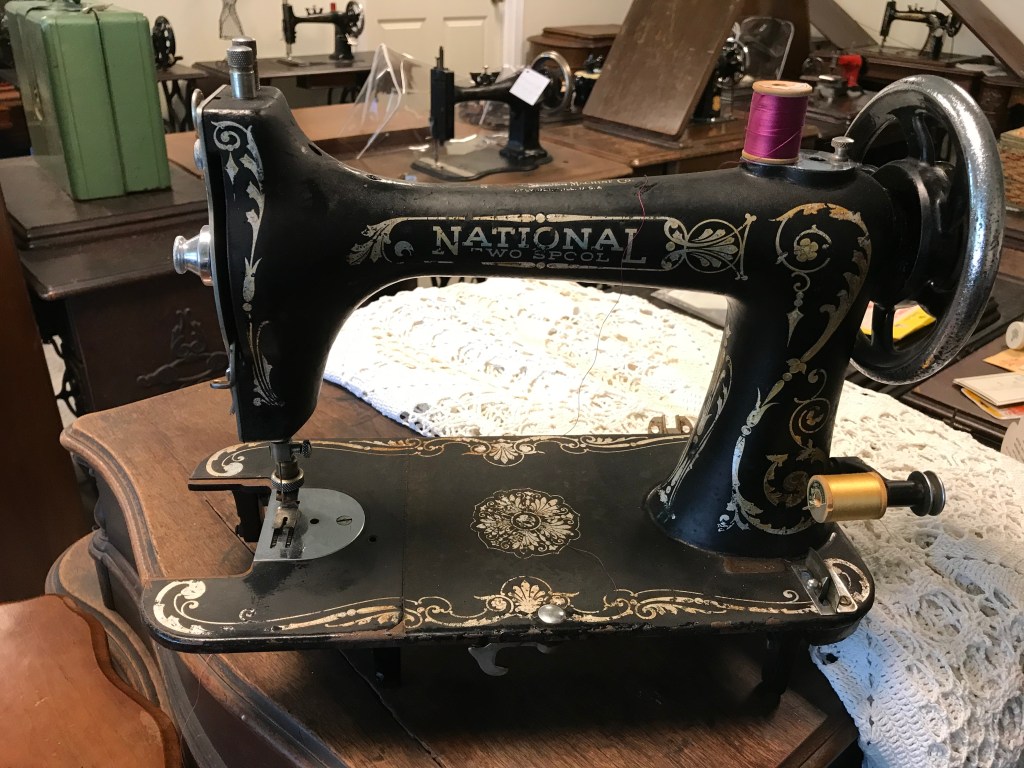
Out of all the machines she demonstrated for us, this is the machine I LOVED! It is a National Two Spool, meaning it holds two spools. Get this – the other spool was the BOBBIN! Yes, the bobbin case was the same size as a spool of thread. Note the large bobbin case in the image below. Why can’t they make them like this anymore?
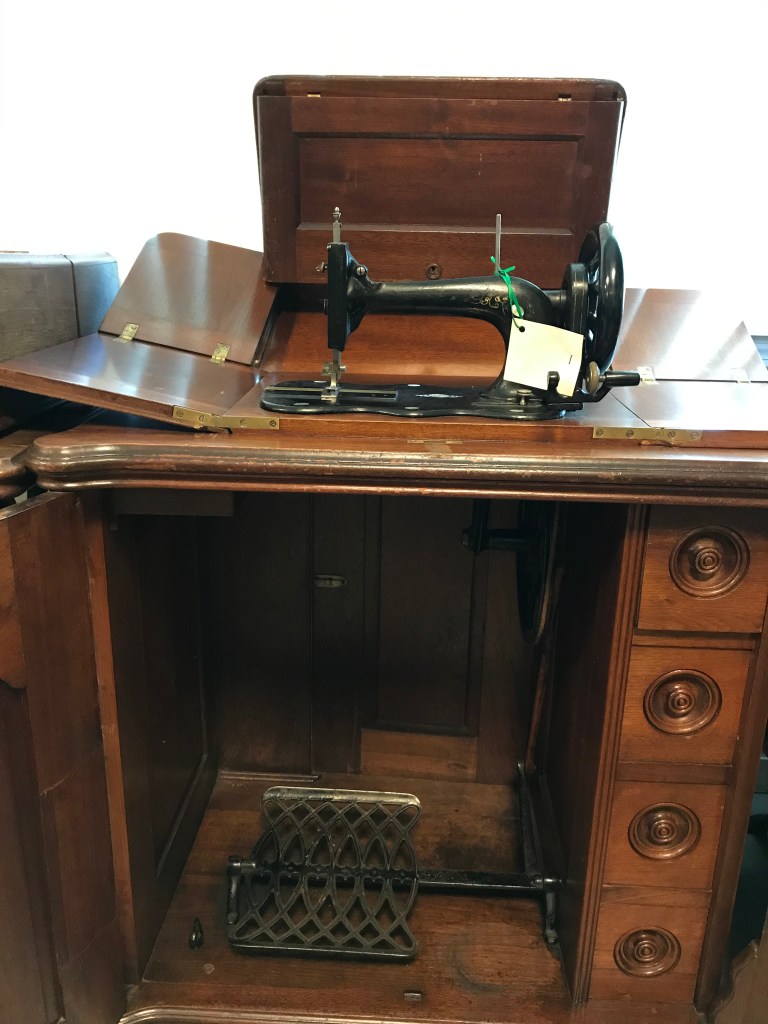
One machine cabinet was ingenious! The cabinet top folded out to also be a workspace. In the bottom, there was a little door to allow air circulation. I mentioned that kids would probably play in that space, but there is also a little lock from inside to keep out kids and animals while working.
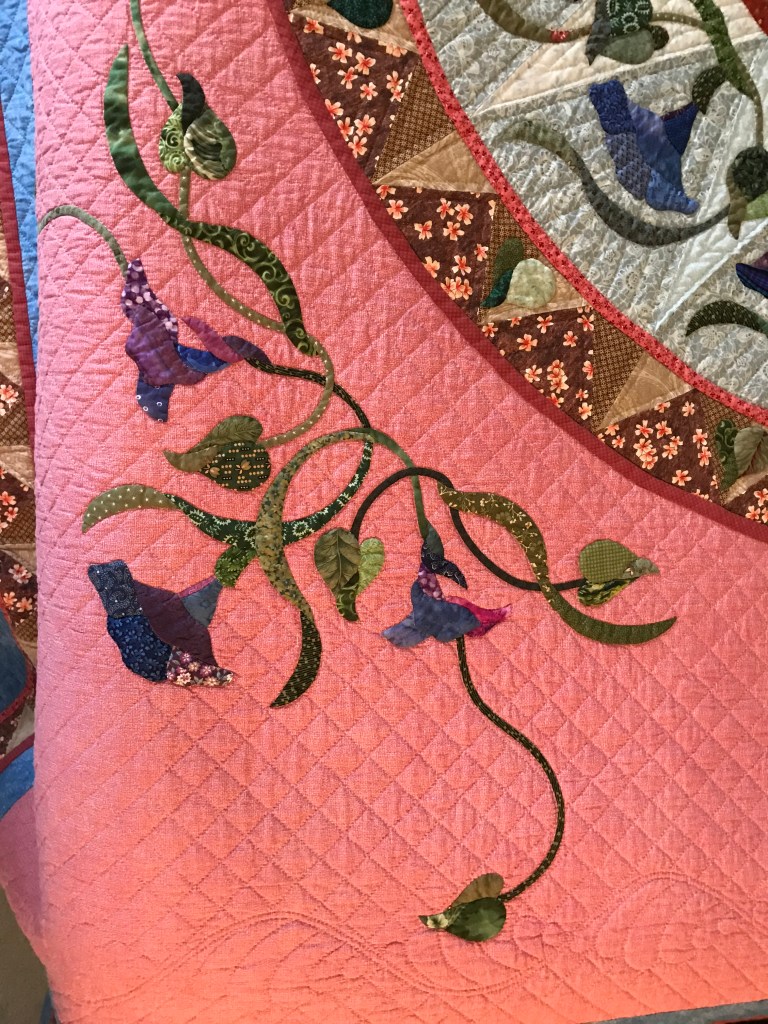
Inside her home there were quilts on top of quilts on a guest bed. While peeling back one quilt after another, as if there was no mattress but a foundation of quilts, I spotted a special one and want to give you a peek – it’s one of my favorites. It really didn’t matter which quilt I picked for the book, every quilt she made was a study in precision.
Last, we visited her sewing room. I’m always curious about where other quilters sew. She had a great space and room for a sewing machine, cutting area, and longarm machine. One entire wall was covered in blue ribbons. I may have been awestruck with the number of ribbons, but she deserved each one.
I think my husband is wonderful, but he is exceptionally so to go along with me to these trips around Alabama and hear me prattle on about seam allowances, thread cutters, and bobbins. He deserves a ribbon too.
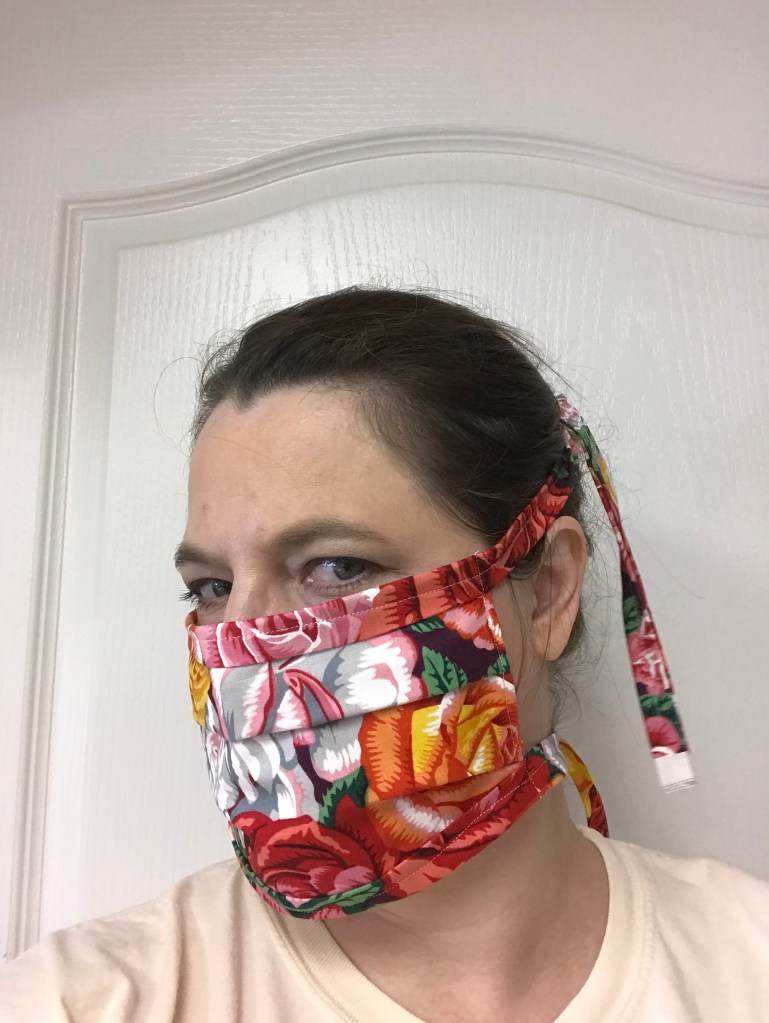
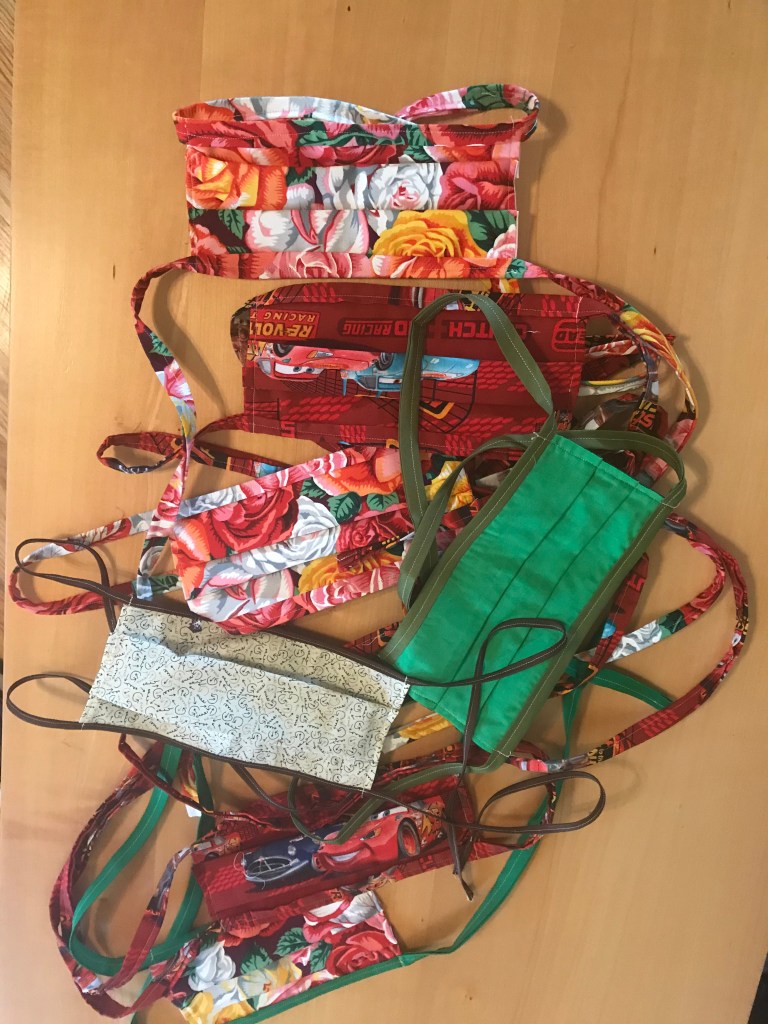
Since we’ve been quarantined, I, along with countless other quilters, have been sewing a lot of masks for the community. There were many ways to make them, and I experimented with several styles and sizes. I felt like I usually made them a bit smaller than I’d hoped, but it is hard to size a mask just right, especially when it’s going to someone you don’t know.
Several people contacted me via social media to make masks for their family, and it was an honor to do this. I didn’t charge money but stated if they wanted to donate a few dollars for supplies, that would be appreciated. If they didn’t want to, it was no problem. Quilters have large stashes of materials.
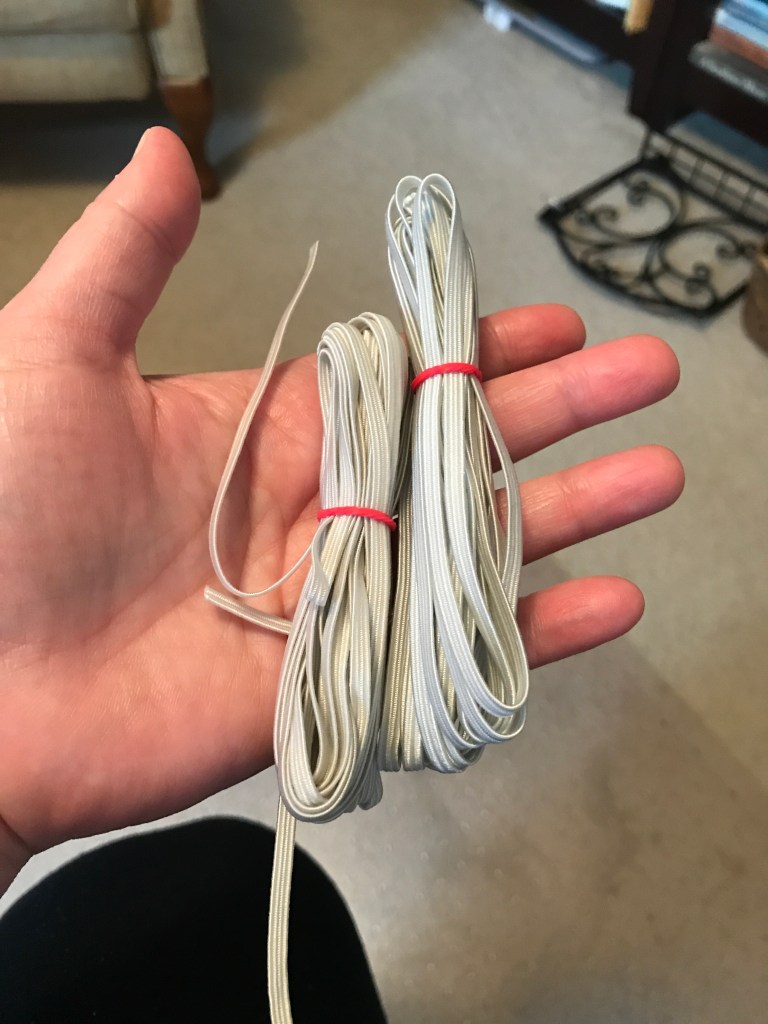
One thing I did not have much of was quarter-inch elastic. Unfortunately, our capitalistic society once again showed its underbelly. This picture represents about $70 of elastic during the second month of lockdown. I could get this for around $7 at Hobby Lobby or JoAnns before the quarantine. I took economics – I know the law of supply and demand. This was very disheartening to me personally.
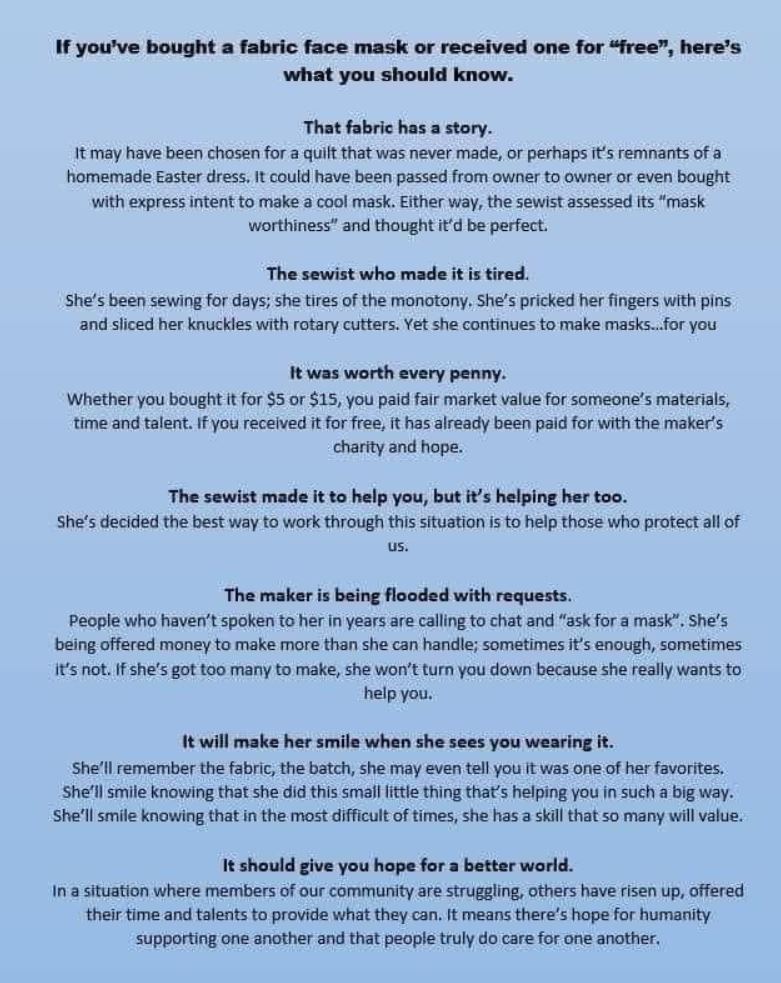
I found a nice little meme while sewing to also explain what it was like to be a quilter during this time. We quilt and make things because we enjoy it, but we also do it because we are givers. We love seeing your reaction when you receive something from us because we remember what it was like to make that for you, think of you while we were making it, and we anticipate your using that item for a lifetime. Enjoy and know it was made with love. Let’s hope we don’t have to use them much longer. I really miss my quilt guild, hugging people, and eating inside restaurants. Stay safe! XO